
Hi all! Thank you for all your wonderful comments on my last pictorial. You've bolstered my confidence enough to try it a second time. One of these days, I will graduate to video tutorials...maybe ;-)

Ruffled Flower Pictorial
supplies:
- cardstock of your choice
- 2 3/8" scallop circle punch
- 1 3/8" scallop circle punch
- 1 3/8" circle punch
- 1/16" circle punch
- medium brad (any color/style; it won't show)
- spray or mister bottle filled with water
- multipurpose adhesive
- sticky strip
- paper towels for clean-up!
| Begin with 5 scalloped circles punched from cardstock of your choice. I used one 2 3/8" scalloped circle and four 1 3/8" scalloped circles. | 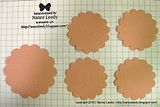 |
| With the 1/16" circle punch, punch a small hole roughly in the center of each scalloped circle. No need for precision; a bit off is more natural. Do this before the next step--it's hard to punch wet paper! | 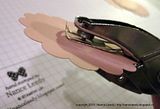 |
| With your spray bottle, mist each scalloped circle with water scruching it in your palm as you spray. Scrunching helps the water penetrate the paper fibers. Do not saturate it--one or two sprays should do. | 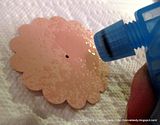 |
| Now give each circle a good scrunching in your palm. | 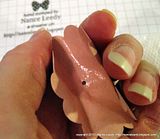 |
| You should have 5 wadded-up balls of cardstock. Don't worry, these will make a flower, I promise you! | 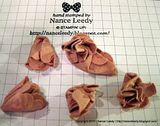 |
| Layer each scalloped circle on the brad beginning with the 4 smaller circles and ending with the large circle. The largest scallop circle should be in back and it should look something like this: | 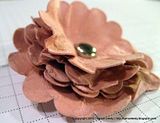 |
| Pull up each layer of scalloped circle beginning with the top. The top scalloped circle will become the center of your flower and it should scrunch up enough to cover the brad. | 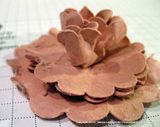 |
| Continue scrunching up each layer. It's okay to mist your paper again to make it more pliable. |  |
| After scrunching each layer, I find it helpful to squeeze in from both sides and then pull apart the layers. | 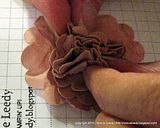 |
| When you are finished scrunching, your flower should look something like this. Continue to play with it until you like the look of it. | 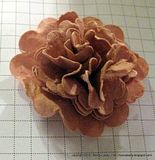 |
| Punch a coordinating circle of cardstock to make a backing for your flower. (Here I used a 1 3/8" circle) Although I don't show it, put a few rows of sticky strip on one side of the circle for easy placement later. On the other side, run a circle of Tombow multipurpose glue. |  |
| Place your ruffled flower on the glue side of the circle and press gently. Too much pressure will squish your flower! | 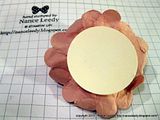 |
| Let the flower dry for about 10 minutes and then it is ready to take the starring role in your next paper project! | 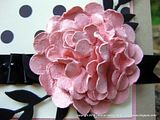 |
| You can also dress up your flower with a marker + color spritzer and some shimmer spray. The shimmer spray looks beautiful in person! | 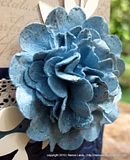 |
I know you will enjoy creating these flowers and hope that you find it easy to do. If you make a creation with a ruffled flower, post your link here in the comments. I would love to stop by and see your creations! Thanks for dropping in today!
5 comments:
Nance your tutorial is just great. You've come a long baby!
I still remember the first time you visited the "scrappers" and made a comment to your mom .... "You girls actually get together once a week to play with paper??" .... Helllooooooo Yes we do! 8-)
Great picture tutorial, I prefer this type to the video tutorials, keep up the good work! Nice looking finger nails too.
Nance, a great tutorial, thank you!! I enjoy everything you do!!
So glad you shared! I hope to try this out soon!
Nance - This is so beautiful. The flower is amazing and I love the ribbon treatment. Such a stunning card!
Post a Comment