

There are a lot of pictures and steps here but please don't let that scare you...I might have been just a tad bit too thorough! Who me?! :-) Here we go!
Begin with two scallop circles. Here I’ve used the 2 3/8” scalloped circle punch. | 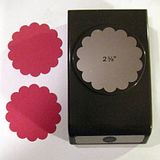 |
| Using a scoring tool, such as Scor-Pal, line up the indents on your scallop circle so each indent lines up in the groove. It does not matter which number score line you use. We are not measuring, just using the grooves to align & score. | 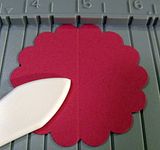 |
| Turn your circle and continue aligning and scoring between each “petal” as you go. | 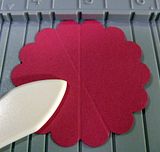 |
| Continue until you have scored all the “petals” of your scalloped circle. | 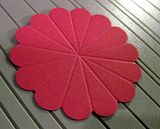 |
| With your paper snips, choose any score line and cut on the scored line in toward the center. STOP at the center! | 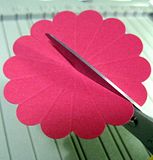 |
| Fold your flower on each of the score lines making “mountains” and “valleys” as you go. Fold your first petal downward. Continue with the mountain & valley folds all the way around your circle. | 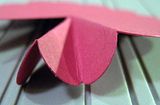 |
| When you are finished folding, you will have something that looks like this: | 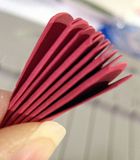 |
| Now you have a half circle that looks like an open fan. Repeat steps #2-7 with the other scalloped circle. | 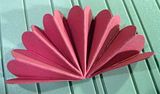 |
| You will end up with two folded half circles. | 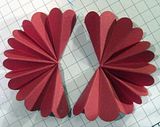 |
| On one of the circles, apply SNAIL glue to both ends of the last scalloped “petal”. On the other half circle, apply SNAIL glue to the underneath of the last scalloped “petal”. | 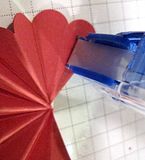 |
| Layer the half circle with the glue on the under-side on top of the other half circle. |  |
| Punch a circle out of cardstock slightly smaller than the size scallop circle you used. In this example, I used a 1 ¾” circle punch. Apply Tombow mono glue to your circle and gently layer your fan flower onto of the circle. Apply gentle pressure. Heavy pressure will smash your flower! Let dry ~5 mins. |  |
| If you wish to apply a brad to the center of your flower, use a paper piercer to pierce a hole through the center and into the circle backing. | 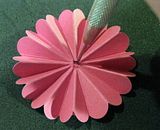 |
| Apply Sticky Strip (or similar strong adhesive) to the back of your circle. | 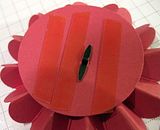 |
| Apply your fan flower to your project and admire your creativity! | 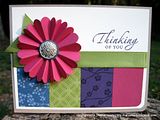 |
Whew! I hope you were able to follow along. This is my first attempt at a pictorial so please let me know what you think. If you have any questions, please don't hesitate to ask! Thanks for stopping by.
8 comments:
Nance your first pictorial is great, very easy to follow and great pictures, can't wait to make a flower now.
This is a fabulous pictorial! The pictures and descriptions are just great and make it easy to follow along. Thank you so much, I am completely inspired to go make one of these now! Have a great day! :)
Nance your tut is FAB! LOVE it. So Easy to follow, and I didn't think there was such a thing as "too thorough"... GREAT Job!
Great directions! Thank you very much!
Nance,
I am so thrilled to have stumbled on your site! You are a truly gifted designer. I can't wait to browse thru your archives, and I plan to take some time and fully enjoy every post! Thank you for sharing you beautiful designs and for providing really helpful information too.
Tracey Nelson
SU! Demonstrator, CA
Great tutorial! I hadn't seen these made this way. Much easier than the way I've been doing it. TFS!
Awesome! Looks really easy and simple to do.
Thank U
Nance,
This is seriously one of the best tutorials/pictorials I've ever come across! Usually, when I want to learn a new technique I end up getting frustrated because people's explanations are too complicated and NOT thorough enough! But you hit the nail right on the head! Like everyone else I am also inspired to go and try to make one of these myself today! Thanks for the fantastic directions!
Hugs,
Christine aka The Stampin' Ninja
Post a Comment