Pages

Monday, January 31, 2011

Laughter is {Heal}thy

Oh my goodness, the first Paper Players blog hop was a resounding success!  I am simply stunned and amazed at how many of you visited this blog 'o' mine yesterday and left such sweet comments!  I treasure each and every one of them.  It was so nice to hear from old friends and new friends and a few that I didn't even know I had ;-).  Big hugs to all of you for stopping by.  If you left your email or blog address, I intend to visit you it just may take me awhile to get through to everyone! :-)

So I have a quick little card to share with you today that needs a little back story.  A dear friend and colleague recently completed a very successful round of chemotherapy.  We were all soooo happy for her and wanted to celebrate this milestone.  She has had the best attitude through everything and I wanted to make her a happy, vibrant, upbeat card to match her personality!  I also need to tell you that her maiden name is....Button.  I know, how cool is that?!  So here is the card I made for her:
So more of the fun and fabulous Sweet Stitches DSP took center stage here with a strip of [retired] Tempting Turquoise DSP and that fun button border!  Now before you go looking for it in the SU catalog, I'll tell you that it's "contraband", that means non-SU!  Shhh.  I don't own it but had to use it while visiting my mom a few weeks ago.  Isn't it perfect?! 
and the punched needle was just crying out for an embellishment so a little bit of embroidery floss tied onto a Daffodil Delight button was the perfect touch!
and a quick peek at the inside with a sentiment from Curly Cute.  I think it did the trick as she squealed with delight when she opened it!  And that's what I love about giving a handmade card--making something uniquely personal that just makes someone's day.

You all certainly made my day yesterday so I hope this has brightened your day just a little--have a great one my friends!

supplies:
stamps: curly cute, word play
ink: early espresso, tempting turquoise
paper: early espresso, whisper white, daffodil delight CS; sweet stitches DSP
xtras: button border punch (EK Success); embroidery floss; designer buttons (brights); corner rounder punch

Sunday, January 30, 2011

Paper Players Blog Hop: PP32

Hi everyone and welcome to stop #9 on the first ever Paper Players Blog Hop!  I'm so glad you could join us on our hop through all the new products in the Spring Mini Catalog!  If you're following the hop, you've arrived here from Marlene Peters's blog where I'm sure you found loads of inspiration!  I am so exited to share my favorite stamp set from the mini catalog with you, Sew Suite:
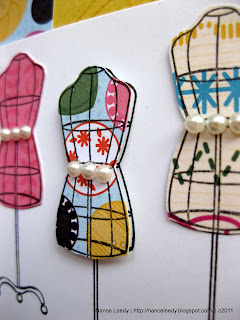
I started with an Early Espresso base and using another favorite--Pattern Pieces--stamped the patterns onto some Daffodil Delight cardstock creating my own background paper.  I am a big fan of paper piecing--probably because I'm not great at coloring(!)--and I love the way the mannequins look in all the papers from the Sweet Stitches line.  I stamped the gals in Early Espresso onto Whisper White CS and then again on 3 different papers.  I cut them out and adhered two with SNAIL and the middle one with dimensionals.
A lady just isn't dressed without her pearls so I trimmed each gal at the waist with a row of adhesive Basic Pearls.  Such a fun little touch!  I matched one of the mannequins to the strip of DSP I used along the side to pull it all together.
And my other favorite item is this adorable Melon Mambo Pom-Pom trim!  Isn't it just the cutest?!  So perfectly coordinated to the designer paper.

Now, it wouldn't be a blog hop without a little candy so I offer you one of my favorite items, the can't-hardly-make-a-card-without-it...Polka Dot Impressions Folder!  To win, all you have to do is become a follower of my blog, become a follower of The Paper Players blog and leave me a comment here telling me that you did so!  If you're already a follower of my blog, then sign up at The Paper Players and then leave me a comment.  And if you're already a follower of both my blog and The Paper Players, then just let me know in a comment! (and big hugs to you!)  I will draw a random winner from all those who follow and leave a comment and post the winner on Sunday February 6th!

In the meantime, be sure to check out our challenge this week at The Paper Players--it's anything goes!  We can't wait to see your creations and peek into your blog.

Happy hopping!
  1. Anne-Marie Hile- www.stampinanne.blogspot.com 
  2. Ann Schach- www.stampinchic.com 
  3. Jaydee- http://www.jaydeestamping.com 
  4. Jeanne Kupsh- http://happy-jeannie.blogspot.com/
  5. Julie Gearinger- http://stampingwithjuliegearinger.blogspot.com/
  6. LeAnne Pugliese- www.weeinklings.blogspot.com
  7. Lesley Croghan- www.alwaysplayingwithpaper.blogspot.com
  8. Marlene Peters- http://marlenehandson.blogspot.com/
  9. >>you're here>>Nance Leedy- /http://nanceleedy.blogspot.com
supplies:
stamps: sew suite, pattern pieces, puns from the past
ink: daffodil delight, early espresso
paper: early espresso, whisper white, daffodil delight
xtras: melon mambo pom-pom trim; basic pearls

Wednesday, January 26, 2011

Pretty in Spring {CD94}

Happy Wednesday everyone and welcome to another week of The Color Dare.  This week Riley has chosen a happy springtime combination for us: Pear Pizzazz, Pretty in Pink and Perfect Plum.  So soft and pretty!
With colors like these, I just had to go the springtime route even though it is nowhere near spring--not even here in Florida!  I cut a Whisper White oval with my Scallop Oval Frame die and stamped the little girl silhouette from Easter Blossoms in Pretty in Pink.  so sweet.  I love how the oval looks like an Easter egg!  Next I ran the Pear Pizzazz card base through the Framed Tulip embossing folder.  The pear polka dot DSP is from the level one hostess pack and is matted with Perfect Plum.  You might remember from last week's Color Dare post that when I color stumps me, I try to use less of it than the other colors.  Perfect Plum has always been a stumper (hi Diane) for me.  But here, it tones down the pastels just enough.
I stamped the Perfect Plum strip behind the bow with a row of eggs from Nature Walk.  They're mostly hidden but I like that--it makes you want to peek around the bow to see what's behind there.
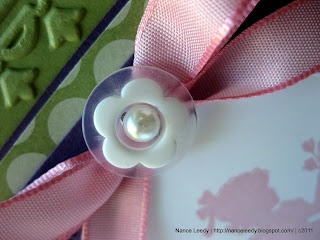
I made a big bow with Pretty in Pink taffeta ribbon and with a piece of Linen Thread tied this little flower button onto the bow.  I just trimmed the thread short and tucked it behind the ribbon.  Our largest basic pearl fits snugly in the center and because they're self-adhesive it stays in place!
More cherry blossoms from the same set for the inside--stamped in Pear Pizzazz and colored with a Blushing Bride marker (I don't have a PIP marker!).  Love this sentiment and stamped in Perfect Plum, it pulls all the challenge colors together!

So there you have it: speckled eggs, cherry blossoms, tulips and a little girl in her Sunday best!  All the ingredients for happy springtime wishes!  If only that's what it took to make spring, spring!  We'll have to wait a while longer for but you don't have to wait to check out the rest of the design team inspiration on their blogs:
Gonna make this one short on the details...I'm pooped!  Thanks for stopping by and, as always, I would love to hear what you think.  I read each and every comment--sometimes more than once(!)--and appreciate them all!  Have a great day everyone!

    Sunday, January 23, 2011

    Paper Player Blossoms {PP31}

    Happy Sunday everyone and welcome to another week with The Paper Players!  This week, fellow DT member and friend, Ann, designed a sketch for us to use:

    Use our sketch as an inspiration, a starting point for your creation.  Feel free to use any shapes for the circle elements and you can flip the sketch too--whatever works for your image(s).  In my case, I did both of those things as they worked better with the stamp I wanted to use.
    I started with the cherry blossom stamp from Easter Blossoms, inked it in Soft Suede and stamped onto Naturals White cardstock.  I have Lesley (of Paper Players) to thank for introducing me to this cardstock--thanks Lesley!  It's thicker than Whisper White and has a very soft--not distracting--fleck throughout.  I really like it.
    The blossoms were colored with a Blushing Bride stampin' write marker and the leaves with Pear Pizzazz.  Some of the flowers have a center dot from my white Signo gel pen but I thought it needed a bit more...so I added the tiniest basic Pearls to some of the blossoms.
     Because I flipped the sketch the element peeking out of the main panel ended up on the bottom.  So, I stamped more cherry blossoms in Soft Suede trailing out from behind the main panel.  I love this look and use it often especially with flowers, vines and leaves.  I also like how it draws your eye down to the sentiment from Teeny Tiny Wishes.
    Per the sketch, I added a strip of Blushing Bride DSP (level 1, hostess pack) and a Pear Pizzazz scallop cut with the Tasteful Trims XL die and run through the Polka Dot Impressions Folder.  For the final circle element, I made a Chantilly Crochet trim bow and attached it with an Antique Brad.

    So what do you think, will you play along with us this week?  We would love to see what you make of Ann's sketch.  If you do play along, be sure to use PP31 in your post, submit a direct link to your entry on the Paper Players blog and let us know you played by leaving a comment.  We can't wait to visit you!


    supplies:
    stamps: easter blossoms, teeny tiny wishes
    ink: soft suede
    paper: soft suede, pear pizzazz, naturals white CS; blushing bride DSP
    xtras: polka dot impressions folder; chantilly crochet trim; basic pearls; antique brads; stampin' write markers

    Saturday, January 22, 2011

    Valentine Guest Designer

    I squealed with delight when I discovered that this card won me the honor of a Guest Designer spot on the Card Patterns weekly sketch blog--what a thrill!  I couldn't wait to see what their fabby sketch would be and sketch #99 for this week did not disappoint:

    I just love those big scallops and circles are probably one of my favorite shapes to use on cards.  I knew I would use the Tasteful Trims XL die for a yummy scallop border and that I would incorporate a Valentine theme.
    The single stamp Be My Valentine is the star here--inked first in Versamark, then Cherry Cobbler ink, stamped onto Very Vanilla CS and heat embossed with clear stampin' emboss powder.  Love this technique for embossing any color you like!  I cut out the heart and adhered it to a Very Vanilla circle cut with Nesties and stamped with Crumb Cake ink and the Woodgrain background stamp.  I stamped just the sentiment a second time, cut it out and popped it up on dimensionals.
    I also highlighted the flower around the sentiment with some adhesive basic pearls.  You can see them better here:
    Love Letter DSP provided the black and very Vanilla patterned paper--one of my favorites from this stack.  The Cherry Cobbler polka dot paper is actually left over from my Jolly Holiday DSP--love using holiday paper for a different holiday!
    The Tasteful Trims XL die made this lovely extra wide scallop border in a quick pass through the Big Shot with basic black CS.  I wrapped the card with some yummy Cherry Cobbler seam binding ribbon laid flat.  Then I came back with a separate bow which I attached with glue dots.  I find it so much easier to make a pretty bow this way!  Before I tied the bow, I tucked in a piece of Chantilly Crochet trim which picks up nicely on the pattern in the black DSP and adds some fun texture.  This card ended up much for vintage/shabby than I intended but sometimes I just have to take a back seat and let the supplies do the talking!  And I've done enough here...would love to have you join the gals over at the Card Patterns blog this week.  It's a great sketch and each week they pick 6 winners!  How cool is that?  A big shout-out to Tracy and the rest of the design team for inviting me on board this week.  Thanks so much!  And thanks to you, dear reader, for stopping by today.  I'll be back tomorrow with another challenge for the Paper Players.  Enjoy your Saturday!  

    supplies:
    stamps: be my valentine, woodgrain
    ink: versamark, cherry cobbler, crumb cake
    paper: crumb cake, very vanilla, basic black CS; love letter & jolly holiday DSP
    xtras: cherry cobbler seam binding ribbon; basic pearls; circle nestabilities; chantilly crochet trim; tasteful trims xl die

    Wednesday, January 19, 2011

    Color Dare #93

    Happy hump day everyone!  Riley has another bright Color Dare combination for us this week: Regal Rose, Pink Pirouette and Pacific Point.  Hmmm....another stumper for me this week!  But, I persevered and in the end I'm happy with the result:
    I have learned that if I am stumped by a color or colors, to cheat a little and include a lot of white and less of the color that is stumping me.  OK, this isn't a new idea but it just dawned on me...maybe I'm a slow learner!  I started with our 3.5 x 5" Whisper White note cards.
    I inked up a clear "D" block with a Pink Pirouette marker and stamped it directly onto the note card.  This would have been easier with an ink pad (!) but I had to work with the supplies I had.  I like the way the marker gave it a streaked look in the background.  On top of my clear block image, I stamped Fine Flourish in Regal Rose.  I cut out a Pacific Point heart with the Scalloped Heart or Heart embosslit and layered it with a piece of retired DSP in Regal Rose that I punched with the Full Heart punch The "love you" sentiment is from Short & Sweet--an all-time favorite-- stamped in Pacific Point.
    A quick-and-simple inside using the much-neglected I {Heart} Hearts stamp set and a sentiment from Seasonal Sentiments.  Thanks so much for stopping by today and be sure to check out the inspiration from the rest of the Color Dare Design Team.  Then hop on by the Color Dare blog to play along.  We would love to come visit you!
    supplies:
    stamps: fine flourish, short & sweet, seasonal sentiments, i heart hearts
    ink: regal rose, pacific point
    paper: 3.5x5" note cards; pacific point CS; regal rose DSP (retired)
    xtras: clear acrylic D block; full heart punch; scalloped heart of hearts embosslit; basic rhinestones

      Monday, January 17, 2011

      Random Amusing Challenge #100 blog hop

      Happy Monday, everyone!  I have a fun treat for you today...I was so excited and honored when Glenda, my friend and fellow Color Dare Design Team member, invited me to be part of a blog hop celebrating her 100th challenge!  Glenda is so upbeat and always leaves such sweet comments so I was delighted to play along!

      Glenda's Random Amusing Challenge #100 is to use RED on your card or project.  Use as much or as little as you like.  Incorporate it by using paper, ink, ribbon, embellishments, whatever you like!  She's even got blog candy but you must play along with the challenge to be eligible to win the blog candy.  If you play along, please leave a comment on Glenda's blog (http://papersscissorsrocks.blogspot.com) and link back to her post from your post.  If you upload to an online gallery, please use the keyword GRAC100.  You have until midnight Pacific Time on January 23rd to play along and you can play along as many times as you like.  The winner will be randomly chosen and announced on January 24th.  At the bottom of this post, you'll find an fantastic group of talented crafters who are playing along too. 

      My card uses a digital edition of SU's Love Impression designer series paper and a fabulous Mojo Monday sketch from a couple weeks ago.

      The sketch lent itself to a masculine card, I thought, so I had my husband in mind when making this card. The base is Basic Gray (did you know gray is the new black?!) and features Love Impressions digital DSP and some of our new Glimmer Paper!

      The sentiment from Word Play was stamped in Basic Gray onto Whisper White and punched out with the 2.5" Circle punch.  Then I stamped it again in Real Red ink and punched out just the globe with the 3/4" circle punch and popped it up on dimensionals.  I was real tempted to mat it with a scallop circle but opted, instead, for a little paper piercing.  A similar framing effect as the scallops but much more masculine.
      I used the sweet heart banner from Valentine Defined on the inside with a Basic Gray sentiment from Teeny Tiny Wishes

      And, here are all the amazing crafters participating in Glenda's blog hop:
      Nance Lempinen-Leedy {that's me!}
      Thank you so much for stopping by today...I hope you hop along to some of the other blogs and then head over to Glenda's blog to play along!  Congratulations, Glenda, and thank you for inviting me along for the HOP!!

      supplies:
      stamps: valentine defined, teeny tiny wishes, word play
      ink: basic gray, real red
      paper: basic gray, whisper white CS; red glimmer paper; love impression digital DSP
      xtras: paper piercing kit; 2.5" and 3/4" circle punches.

      Sunday, January 16, 2011

      Springtime Silhouette for the Paper Players {PP30}

      Happy Sunday, everyone. I hope you are enjoying your weekend!  Welcome to another week with The Paper Players.  As this week's hostess, I am excited to bring you a gorgeous Color Challenge: River Rock, Baja Breeze, Rose Red and Very Vanilla.

      To me this is a very soft and feminine color combination so I reached for some new toys from the Spring Mini Occasions catalog to make this for you:

      Isn't she darling?!  I am sucker for silhouette images so when I saw this Easter Blossoms set in the new mini, I knew it would be one of the first ones I ordered!  Everything stamped here is from this set--it has so many great pieces!  The little girl is stamped in Baja Breeze onto a piece of Very Vanilla that had been cut out with the Oval Scallop Frame die.  The Rose Red scalloped oval was cut with my Nestabilities.  
      Onto the River Rock background panel, I stamped these gorgeous cherry blossoms in River Rock ink coming out on either side of the Springtime Vintage designer paper.  I like how they appear to be growing right out of the paper!  I also love the tone-on-tone look of stamping cardstock with the same color ink.  It adds just enough interest to the background to keep things interesting!

      I covered the seam between the two strips of designer paper with some yummy Rose Red seam binding ribbon that needed a little scrunching on one side...
      and a bow on the other!  Matches the bow in our girlie's hair nicely doesn't it?
      More River Rock cherry blossoms trailing along on the inside.  After stamping in River Rock, I colored a few blossoms with my blender pen and Rose Red ink.  I also put a dot of white in the center of each with a Signo gel pen.  Finally, a Baja Breeze sentiment finished the inside and brought all challenge colors together.

      Now, I would love to see how you bring these colors together!  Be sure to check out the rest of the Design Team inspiration over at The Paper Players blog--they're sure to have some great eye candy for you!  If you decide to play along, please provide a direct link to your card at the Paper Players blog and use keyword PP30 if you upload to a public gallery.  You've got until midnight (PST) on Friday January 21st to create something wonderful!  Have a great week, my friends!

      supplies:
      stamps: Easter Blossoms
      ink: Baja Breeze, River Rock, Rose Red
      paper: Very Vanilla, River Rock; Springtime Vintage DSP
      xtras: Rose Red seam binding ribbon; Basic Pearls, white signo gel pen, blender pen

      Friday, January 14, 2011

      Luxury TY

      Happy Friday everyone!  I just have to share a recent Thank You card I made for my mom's significant other.  At Christmas, he gifted my daughter and me with fabulous purses from one of our favorite stores.  The gift was such a surprise and so generous that it deserved a special thank you.  If you're like me special = bling, lol, but since it is for a man it had to be subdued and more subtle.  Here is what I came up with:
      So here is another secret of mine...I love shopping bags of all kinds and I save the best ones.  Trouble is, I don't always know what or when I will use them so they tend to hang around for awhile....lol.  But then a cool idea strikes and I have the perfect thing!  That was the case here as I cut up a shopping bag I had hoarded kept from the aforementioned store.  It makes the perfect DSP, don't you think?  The colors are so rich!  It's hard to tell in the photo but I matted it with brushed gold cardstock to enhance the gold embossing on the paper and add a touch of bling without being overdone.
      And look at that!  Elegant Eggplant is the perfect match to one of the stripes in this "paper".  I gave my ribbon the scrunchy treatment and offset a sentiment from a Papertrey Ink set stamped in Early Espresso on Very Vanilla and popped out with the Decorative Label punch.  Elegant, yes?
      The inside treatment left plenty of room for my handwritten note with a skinny strip of the paper bag paper on a piece of Very Vanilla cardstock.  Of course, I wrote my note with my Early Espresso marker to match the card base!  I hope he likes it!  Anyway, thanks for indulging my recycled card.  I just know there are a few of you out there who recognize the bag and will appreciate the re-purposing!  Enjoy your day, my friends!

      Don't forget...the Virtual Canopy Club is still open!  :-)

      supplies:
      stamps: Signature Greetings (PTI)
      ink: Early Espresso
      paper: Early Espresso, Very Vanilla cardstock and homemade DSP
      xtras: Elegant Eggplant 1/4" grosgrain ribbon; Decorative Label punch

      Wednesday, January 12, 2011

      Pure Vanilla Saffron: {CD92}

      Hiya friends, welcome to another week at The Color Dare!  We were thrilled to see so many talented crafters join us last week--thank you!  This week, Riley's got a doozy of a color combination--at least I thought so.  CD 92: Pure Poppy, So Saffron & Very Vanilla.  Seems simple right?  Well....I have to admit, I still have not completely embraced Pure Poppy and find it challenging to work with.  But that's what this is all about, right?  Challenging ourselves outside of our comfort zone.  So without further adieu...

      I like the paper I used and the stamps...just not crazy about the final result!  And, I had to throw some Chocolate Chip in there because I was swimming upstream on this one, lol!  Love the new Framed Tulip textured impressions folder though!  And so yummy in Chocolate Chip don't you think?  The background paper is Botanical Gazette designer series paper and it is sooo pretty.  This piece was already distressed, I just added the stamped images from Nature Walk, starting with the row of speckled eggs along the bottom, in Chocolate Chip, and the floral image in Pure Poppy. 
      I also added the waterspots from French Foliage in So Saffron, the sweetest bumblebee from Nature Walk in Pure Poppy and a Chocolate Chip sentiment from Cheep Talk.  I matted the whole panel onto So Saffron CS

      and added a double row of the Dotted Scallop Ribbon border in So Saffron & Pure Poppy.  Some yummy Very Vanilla seam binding ribbon with just a touch of Chantilly Crochet Trim finished it off nicely.   I repeated some of the images on the inside, leaving lots of room for a quick note of Christmas thanks--still working on those!
      So there you have it!  I am confident that y'all can come up with something fun for Color Dare 92!  Be sure to check out the rest of the design team, below, for some fabulous inspiration.  If you play along, be sure to link up your project over at the Color Dare blog and use CD92 in the description.  Can't wait to come visit you!
      supplies: 
      stamps: Nature Walk, Cheep Talk, French Foliage
      ink: Pure Poppy, So Saffron, Chocolate Chip
      paper: Chocolate Chip, Very Vanilla, So Saffron CS; Botanical Gazette DSP
      xtras: Framed Tulip textured impressions folder; Seam Binding ribbon; Chantilly crochet trim; Dotted Scallop Border punch


        The Virtual Canopy Club is still open for new members.  Refer to this post HERE for all the details!

        Sunday, January 9, 2011

        Virtual Canopy Club

        This is my second post of the day(!)...if you're looking for The Paper Players Valentine Challenge {29}, click HERE.


        I love reading your comments--they truly make my day.  Sometimes readers say they wish they lived near me so they could come to my classes and workshops.  Well, guess what?  Now you can, no matter where you live!   

        I am excited to announce the availability of virtual membership in The Canopy Club! The Canopy Club meets monthly in my home and we make 3 paper projects designed by me. Each club member takes home 3 completed projects and with a monthly $15 order SU order, we rotate hostess benefits among all the members. Each month one member takes home the hostess benefits for the order! 

        With Virtual Canopy Club, now you can participate too!  Each month, in advance of our club meeting, I will mail you all the supplies and tutorials to make our projects.  You can make them at your own pace or, through Skype, you can join us online during our club meeting!   In return, email me your monthly Stampin' Up! order (min. $15) and I will add you to the monthly hostess benefits rotation!  When you order arrives, I will ship it directly to you.  You'll get all the benefits of my in-person club and even meet some new friends too without leaving your house...or cleaning up after our group!  :-)

        What do you think?  I'm excited about the opportunity to meet some of you, even if it is virtually!  If you would like more information or if you're ready to say "Sign me up!", send me an email to nleedy@cox.net. I hope to hear from you soon and can't wait to craft with you!

        Paper Players Sweetheart {CCMC132} & {HSS49}

        Welcome to the first Paper Players challenge of 2011!  This week we're getting ready for the next big card holiday--Valentine's Day! 
        Show us a little love with your Valentine's themed projects this week--any colors, any stamps, any layout just a theme of Valentine.  For my card, I used this great sketch over at Create with Connie & Mary
         and with the Greeting Card Kids stamp in hand, here's what I made for you: 

        I love non-traditional color schemes for holidays and I was itching to use my recently acquired Marina Mist striped grosgrain ribbon so I let the ribbon do the talking!  The En Francais background stamp was inked up in Marina Mist and stamped on the MM card base.  I used my square Nestabilities to cut out a piece of Very Vanilla on which I stamped this little sweetheart in Jet Black Stazon ink.  From there, I got to work coloring her with my Stampin' Write markers:
        I used Marina Mist, Blush Blossom and Real Red for her clothes, skin & valentine heart and Daffodil Delight with just a touch of River Rock for her blonde tresses.  Using just the teensy-weensy heart from the 2-step Owl punch, I popped out a little heart from our new Glimmer Paper to give her Valentine some pizzazz!  And because you can never have enough sparkle, I also added Dazzling Diamonds to her crinoline.
        I really love the big bow in the sketch so first I wrapped my card with the Marina Mist striped grosgrain ribbon, securing the ends underneath the square with glue dots.  For the bow, I made a big loop of ribbon, secured the ends with glue dots, pinched the center, tied it off with Linen Thread and secured it to the card with more glue dots (love those!).  I think it's so cute how it matches the bow in her hair!
        I made a quick panel of Very Vanilla for the inside (cut to 5 x 3.75") and stamped our sweetie again in Marina Mist and with a sentiment from Teeny Tiny Wishes in Real Red:
        I realized with all this blue, this card also qualifies for the Winter Blues Color Splash challenge at Hand Stamped Sentiments too!

        I do hope you'll make a Valentine project to share with us at The Paper Players this week. The deadline is midnight (PST) Friday January, 15th to be in the running for "Headliner" and "A Cut Above".  Each week the challenge hostess chooses one "Headliner" and the Design Team each chooses "A Cut Above" to feature on The Paper Players blog.  We can't wait to see what you will share with us!

        supplies:
        stamps: Greeting Card Kids, En Francais, Tiny Tags (love), Teeny Tiny Wishes
        ink: Marina Mist, Jet Black Stazon, Real Red
        paper: Marina Mist, Daffodil Delight, Very Vanilla CS
        xtras: Marina Mist 1 1/4" striped grosgrain ribbon; basic pearls; Nestabilities; Stampin' Write markers; linen thread; dazzling diamonds; Glimmer Paper


        I'll have another post later today...