Pages

Showing posts with label happiest birthday wishes. Show all posts

Thursday, March 29, 2012

Two for One {CCMC195}

Hiya friends, and welcome to another week at Create with Connie & Mary!  The gals have a fun color challenge for us this week:
Basic Gray and So Saffron are two of my favorite colors and while they do look good with Poppy Parade....I'm still not in love with that color!  I think I will be glad to see it retire in June!  So what to do with these colors?  Well, inspiration truly is everywhere as evidenced by the design on this tee at I recently bought from Old Navy:
I loved the interlocking diagonal stripes and the pattern that runs underneath the stripes.  So...with that in mind, here's what I made for Connie & Mary:


Kinda cool, huh?  Different?  You know my philosophy when I am not keen on color, right?  Use it in small doses...as in half inch wide strips, lol!  I cut half inch strips from a collection of designer papers (supply list below) and started laying them out on a piece of textured Basic Gray cardstock.  The Basic Gray cardstock started out slight larger than I wanted the end product to be.  That way, I could lay the strips with edges hanging over and trim the whole edge at once.  Gives a nice even cut that way.  Once I had the strips laid out, I used the 2 1/2" circle punch to pop out a space for the sentiment from the Word Play set.  

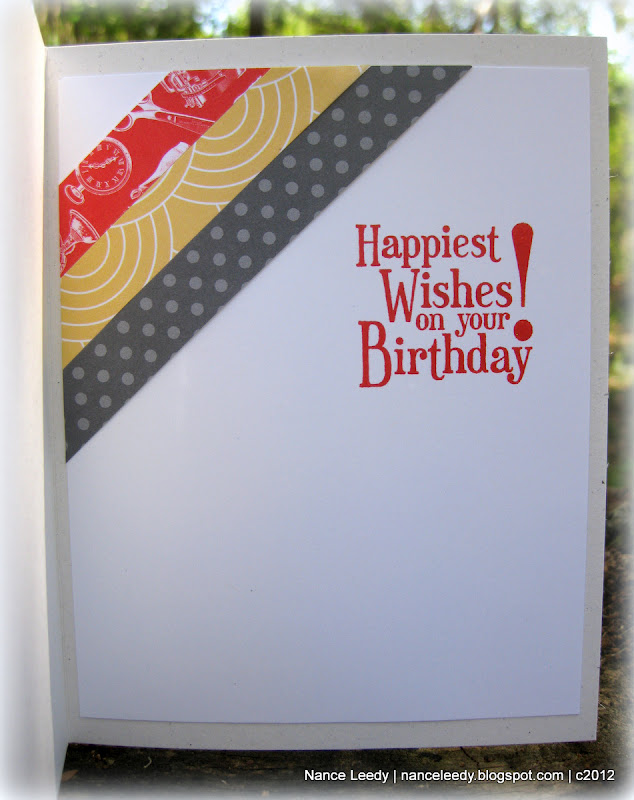
Of course, there was some leftover strips which I just added to the inside along with a sentiment from Happiest Birthday Wishes.  I even stamped it in Poppy Parade!  Now, before I let you go I also wanted to show that these colors could be used for a more feminine card.  I saw this beauty over at Kristin's blog and just knew I had to case it.  Be sure to check out Kristin's blog--she is amazingly talented and one of the nicest people I've met in blog-land.  Anywho....here's my take on her blossom card with this week's colors:
 and a peek at the inside:


Sorry for the pic-heavy post, there's just so much to show you!  And there's also much to see from the Design Team over at Create with Connie & Mary...be sure to check it out and maybe you'll think about playing along with us this week!  The challenge ends on Wednesday, April 4th at Noon (EST).  Hope to see you there!

 Photobucket
Supplies 
Card #1: Stripes
Stamps: Word Play; Happiest Birthday Wishes
Ink: Poppy Parade
Paper: Naturals White, Whisper White CS; Basic Gray textured CS; Attic Boutique DSP (poppy); Pocketful of Posies DSP (so saffron); Designer Patterns Stack (Neutrals-basic gray)
Xtras: Basic Gray Satin Ribbon; Basic Rhinestones.

Card #2: Blossom
Stamps: Friendly Phrases; Pursuit of Happiness; Broadsheet Alphabet; Mixed Bunch
Ink: Poppy Parade, So Saffron
Paper: Naturals White, Whisper White CS; Basic Gray textured CS; Just Add Cake DSP
Xtras: Basic Gray Satin Ribbon; Basic Rhinestones
Punches: Blossom, 1" circle, 3/4" circle, 2 1/2" circle, Itty Bitty Punch Pack, Blossom Bouquet Triple Layer, Boho Blossoms

Thursday, November 17, 2011

All Buttoned Up {CCMC176}

Happy Thursday, friends, and welcome to another week with the Create with Connie & Mary Thursday Design team! We alternate between sketch and color challenges and this week it's...Sketch Time!


Cool isn't it?  I wanted to do something a little different than a flower for the focal point so I dusted off the yet-to-be-used package of Shaker Frames from the Holiday Mini catalog and came up with this:


This one was personalized for a friend and co-worker who just happens to have the maiden name of....Buttons!  Of course, she loves them so I filled the shaker frame with designer buttons in Certainly Celery, Rich Razzleberry, Tempting Turquiose and...


a little bit of Mica Flakes for some added sparkle.  As if the scalloped circle of silver Glimmer Paper wasn't enough, right?!  There's never enough sparkle in my book!  I filled the back of the Shaker Frame with a 1 3/4" circle of Whisper White and cut a 2" circle from a clear window sheet with the Circles #2 die.  To cover the edges, the Glimmer Paper was punched with the 1 3/4" circle punch and the 2 3/8" scalloped circle.  You might also notice that the theme of circles runs through each element of the card in the polka dotted designer paper, the polka dot impression folder, the circle frame and, of course, the buttons themselves!  

The layout of the rectangles took a little bit of measuring so I thought I would share the dimensions I used:
  • Standard A2 card base
  • Whisper White panel: 5 1/4" x 4"
  • Rich Razzleberry rectangle: 1.5" x 3"
  • Certainly Celery rectangle: 2.5" x 2"
  • Tempting Turquoise rectangle: 2.5" x 1"
I'm going to keep this one short, friends.  It's been one heckuva busy week around here!  Be sure to stop on by Create with Connie & Mary to check out even more inspiration from the fantastic design team!  If you decide to play along with us, please link up your creation by Wednesday, November 23rd at Noon (EST).  I can't wait to come visit you!  Thanks for stopping by today!

Photobucket

supplies:
stamps: happiest birthday wishes
ink: tempting turquoise
paper: tempting turquoise, whisper white CS; silver glimmer paper; brights & subtles pattern designer paper stacks
xtras: shaker frames; white baker's twine; clear window sheets;designer buttons (subtles & brights); polka dot impressions fold; 1 3/4" circle & 2 3/8" scallop circle punches; circles #2 die

Sunday, November 6, 2011

Let's Get Cooking! {PP71}

Lordy bees, have I got a challenge heavy project for you today! Happy Sunday, friends and welcome to another week with The Paper Players Anne Marie is our hostess with the most-est this week and she has cooked up a Texas-sized recipe for Theme Challenge #71!  Take a look:
Wowzers!  But I had a day off of work and was feeling fresh and ready for the challenge.  I put on my crafting apron and browsed some favorite challenges sites for additional inspiration.  Bingo!  Check out these amazing fall colors over at the Colour Q:
I also remembered this amazing sketch from Create with Connie & Mary that was perfect for Anne Marie's "3 different patterned papers" (there's still time to play at CCMC):
So, I mixed all of that in my crafting stew pot and came out with a birthday card for a friend and co-worker:
The stamp set, Forever Young, has just been itching for ink so I obliged in Soft Suede, stamped onto a 3" circle of Very Vanilla and sponged a setting sun with Pumpkin Pie ink.  You can see 3 different patterned papers in Island Indigo, Pumpkin Pie and Cherry Cobbler--all from Designer Patterns Paper Stacks in the Brights, Regals, and In Color family of colors. 
For the two different ribbons, I wrapped the scalloped panel in Soft Suede taffeta ribbon and tucked in a small piece of Chantilly crochet trim ribbon.  This is such a great way to bring in another color and some texture without using a lot of specialty ribbon!  Since this is Anne Marie's challenge, I had to give it more than just a sprinkling of glitter!  LOL!  So, I [liberally] spritzed the main image with Vanilla Smooch Spritz for some real sparkle and glitz!
Lastly, using Stampin' Write markers, I finished off the inside with all the challenge colors and a bright and happy sentiment from the hostess set Happiest Birthday Wishes.  All together, I used 3 different patterned papers, 2 different ribbons, one punch, one die, 4 color families and 5 stamp sets to complete this card!  Whew, you should see my craft room--it exploded!  Well, I hope you will go make a mess in your craft space and join us over at The Paper Players with your handcrafted creations!  Be sure to check out the rest of the Design Team inspiration and give a big welcome to our November Guest Designer, Susan Joyce--hi Susan!

The Paper Players Design Team
Tara Bilbao
  Susan Joyce (November GD)

If you can join us, please load your creation to The Paper Players by Friday, November 11th at midnight (PST).  I can't wait to visit you!  Thanks for stopping by, friends!

Photobucket
supplies:
stamps: forever young, woodgrain, short & sweet, happiest birthday wishes, pony party (grass)
ink: soft suede, pumpkin pie
paper: soft suede, very vanilla; designer pattern paper stacks (brights, regals, in color)
xtras: soft suede taffeta ribbon; chantilly crochet trim; 3" circle die; scallop border punch; vanilla smooch spritz

Friday, September 30, 2011

KA-POW, Gator Style {KKC02}

Look what I found...a new challenge!  It's the KA-POW Kreative Challenge over at my friend Carrie Gaskin's blog.  Carrie is just bursting with creative energy and I'm so excited to see what her challenge brings!  This week Carrie has this fabulous sketch for us to follow:
OK, before I show you my card...let me 'splain something.  This is a masculine card for a co-worker who LOVES football!  Specifically, GATOR football.  Gator colors are orange & blue, I mean straight up Orange and Royal Blue--yikes--not colors I use very often or ones that I even like together sooooo using Carrie's sketch and some Well Worn DSP, I made a Gator card Stampin' Up style:
Not being a huge sports fan either, LOL, I didn't have any appropriate stamps so I used My Digital Studio to color the football from the Touchdown set in Cajun Craze and print it onto Very Vanilla cardstock. I actually printed two of them so that I could layer each piece and give it some dimension:
A little Soft Suede sponging makes it gritty and a little dirty, just like it came off the field!
 The Two Tags die was a little too big for my needs so I just moved the paper down and ran it through the Big Shot again to make it smaller.  On the other end I added a Soft Suede circle, some twill and tiny tags attached with a vintage pin.
 And check out the button trim!  I threaded three retired buttons onto a single piece of linen thread and tied a knot at each end.  Glue dots on each button attached it to the card easy-peasy.
 And a quick look at the inside with another piece of Well Worn DSP and a Cajun Craze sentiment from Happiest Birthday Wishes.  And there you have it...Gator football, Stampin Up style.  I would love to hear what you think and encourage you to check out all the samples over at the KA-POW Kreative Challenge.  Best wishes to Carrie and the team!
Photobucket
supplies:
stamps: word play, happiest birthday wishes, tiny tags, french foliage (waterspots), touchdown (MDS)
ink: soft suede, not quite navy, cajun craze
paper: naturals ivory, soft suede, not quite navy; well worn DSP
xtras: two tags die; vintage trinkets; linen thread; designer buttons (earth--retired); medium jewelry punch; twill tape; 1 1/4" circle punch

Sunday, September 4, 2011

Flutterby Birthday {PP62}

Happy Paper Players Sunday, friends!  Changes are afoot here at The Paper Players as we say goodbye to our dear friends on the summer design team and our August guest designer but welcome our new Fall team aboard!  I am so excited to be stamping alongside these gals--they have some amazing creations to share with you!  Me...not so much today--I had a hard time finding my mojo on this one so I turned to a favorite color challenge site and discovered a double challenge!


...to create this for you:

Not sure this is exactly what I had in mind when I set out but it's growing on me.  I do love this color combination and had fun featuring all the gorgeous Pool Party cardstock!   Three rows of Pool Party were punched with the Lace Ribbon border punch and adhered to basic black.  The Tangerine Tango scallop dots ribbon was made a little wider with a strip of TT cardstock underneath.


The double butterfly is made with the Beautiful Butterflies die and the Beautiful Wings embosslit.  I wish now that I added another rhinestone to the two smaller butterflies--funny how stepping back in a photograph can make small things obvious!  I thought the whimsical sentiment from Happiest Birthday Wishes added the perfect sense of movement with the butterflies.

Thank you so much for stopping by today...do hop over to The Paper Players to check out the amazing creations of the entire Design Team...I am so lucky to be working with these gals!  I hope that you will play along with us this week...you always need a birthday card for the stash, right?!  If you join us, please link up your creation at The Paper Players by Friday, September 9th at midnight (PST) to be considered for Headliner and A Cut Above.  I hope you are having a great weekend!

The Paper Players Design Team
Tara Bilbao
Sandra Conner (September GD)
Photobucket

supplies:
stamps: happiest birthday wishes
ink: jet black stazon
paper: pool party, tangerine tango, whisper white, basic black, melon mambo CS; patterns designer stack (brights)
xtras: tangerine tango scallop dots ribbon; beautiful wings embosslit; beautiful butterflies die; basic rhinestones; lace border ribbon punch

Tuesday, July 26, 2011

Happy Birthday LeAnne!

Thursday is my friend, and fellow Paper Players DT member, LeAnne's birthday...Happy Birthday LeAnne!  LeAnne is such a sweet person with immense crafting talent and a wicked sense of humor!  Her emails and comments always brighten my day so I created this card to send some happiness her way!
Pinwheels are all the rage in the paper crafting world and I was inspired by the pinwheels on this card over at my friend Rita's blog, Cards by Rita.  The pinwheel is super simple to make--this one is a 3" square of Just Add Cake designer paper, scored corner to corner to form an "X" and cut in from each corner almost to the center but not all the way.  I made it more difficult by punching holes for the brad but it would be much easier to secure the ends with a glue dot in the center!  Live and learn.... :-)
The French Filigree background stamp was inked in So Saffron and stamped directly on another piece of Just Add Cake designer paper to mimic swirling wind!  That swirling wind is waving a sentiment flag cut from Whisper White cardstock and punched at the end with a 1 1/4" square punch on an angle and wrapped around a lollipop stick.  Lollipop sticks can be bought in bulk wherever candy making supplies are sold. 
Of course, wherever there is wind there are clouds...cupcake clouds that is!  On this card, these were punched with the Build-a-Cupcake XL punch and sponged with Baja Breeze.
And because I can't stop making cupcake clouds, I added a few more to the inside with some matching DSP and another sentiment from Happiest Birthday Wishes (sorry the pic is so dark).  I hope you'll ride a few of those cupcake clouds over to LeAnne's blog and wish her a Happy Birthday...have a good one friends!

supplies:
stamps: french filigree; happiest birthday wishes
ink: so saffron, wild wasabi, baja breeze
paper: wild wasabi, peach parfait; baja breeze, whisper white CS; just add cake DSP
xtras: polka dot impressions folder; build-a-cupcake punch; glimmer brads (subtles); 3/4" circle punch; lollipop stick; 1 1/4" square punch;

Thursday, July 21, 2011

Sweet Birthday: {CCMC159}

Oh my goodness, has it really been 10 days since I last posted?! Yikes!  Sorry friends, I guess I needed a bit of a break.  :-)  Thank goodness for this week's challenge over at Create with Connie & Mary to get my crafting mojo in gear!  This week we have some really pretty colors for CCMC159, how about Regal Rose, Marina Mist and Sahara Sand...lovely!
I paired this week's colors with this adorable sketch from the Sweet Sunday Sketch Challenge (SSSC126):
With colors and sketch in hand, I knew just what I wanted to do...
I just love that flagged end to the Regal Rose designer paper!  The balloon was made by stamping a sentiment from the new hostess set Happiest Birthday Wishes in Marina Mist ink onto MM cardstock.  The circle was made with the 2 1/2" circle punch and edged with some Tombow liquid adhesive and Silver Glass Glitter.
The balloon basket from Sweet Centers was stamped in Sahara Sand to which I added some Regal Rose balloon weights, Linen Thread ties and Sahara Sand clouds punched with the Build-a-Cupcake punch.  I can't believe I don't have a Regal Rose marker so I substituted with a RR ink pad and blender pen.  Guess what's on my next order?!
I love those cupcake clouds!  And here's a quick peek at the inside:
Another banner panel for the inside with more clouds, this time sponged with Marina Mist ink and the super happy sentiment also from the Happiest Birthday Wishes hostess set.  

That's all for me today folks--I hope to be back to a regular posting schedule now.  Be sure to check out the rest of the design team inspiration over at Create with Connie & Mary--they're sure to have some lovely projects!  We hope you'll play along with us--we can't wait to see what you create with these colors!

supplies:
stamps: sweet centers, happiest birthday wishes
ink: marina mist, regal rose, sahara sand
paper: sahara sand, whisper white, marina mist CS; designer patterned paper (brights)
xtras: build-a-cupcake, scallop ribbon border, 2 1/2" circle and 1 1/4" square punches; basic rhinestones; silver glass glitter; linen thread; blender pen