Pages

Showing posts with label ccmc. design team. Show all posts

Thursday, January 26, 2012

Twitterpated Cameo {CCMC186}

Happy Thursday, friends, and welcome to another week at Create with Connie & Mary! It's a sketch week and the gals have a really pretty sketch that I think you will like.  Let's have a look-see:
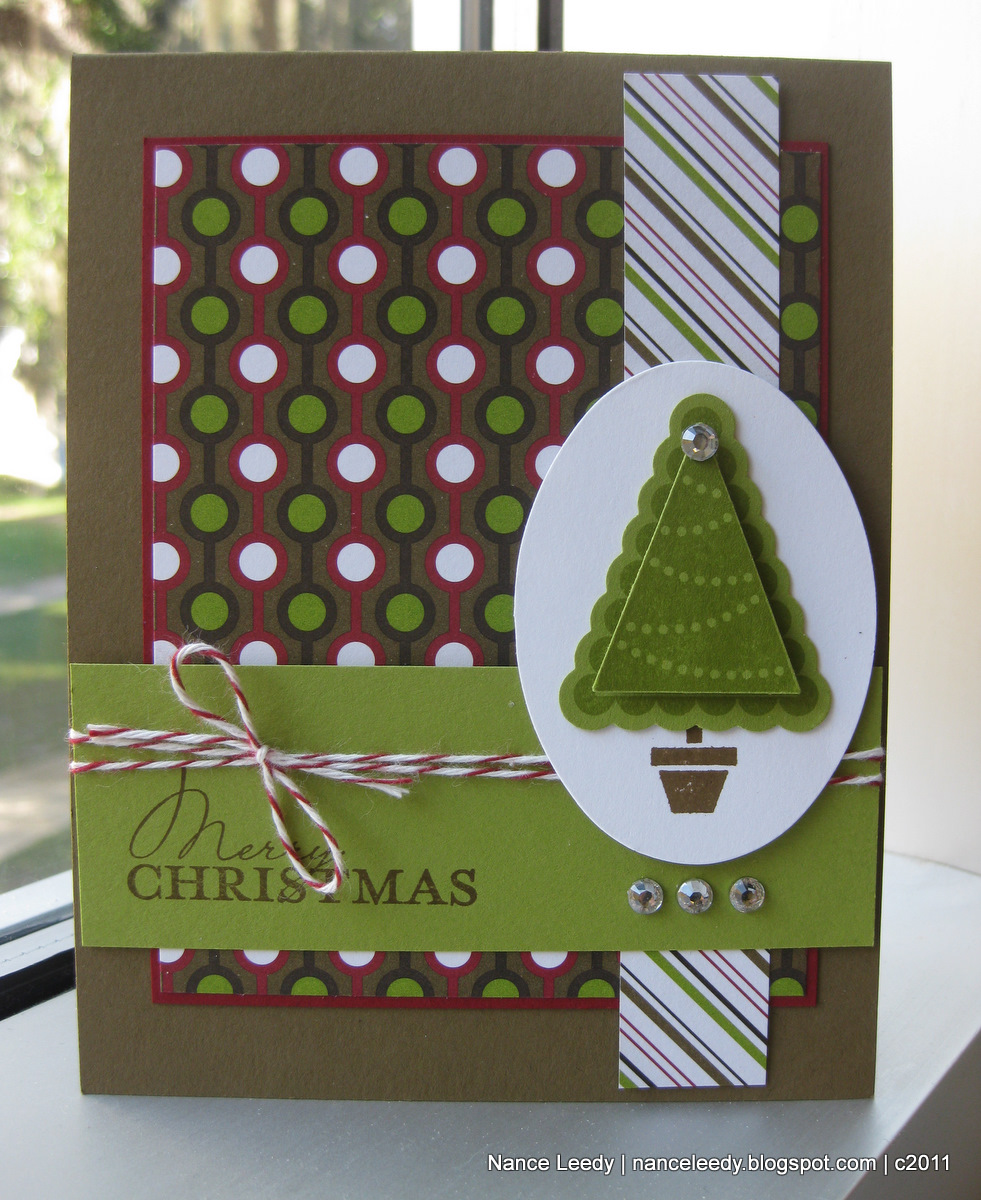
 The first time I saw this sketch, the scallop framed oval made me think of a cameo.  Then I saw this great card which just happened to be created by my fabulous Mom (!) and I was inspired to make this:
The colors and vintage patterns of the Twitterpated designer paper seemed like a good companion to the old-fashioned cameo.  But wouldn't you know it, I don't own any Twitterpated DSP so you know what I did?  That's right...printed it in My Digital Studio!  And if you read all the way through today's post, there's a surprise for you at the end!  ;-) 
I stamped the cameo frame in Blushing Bride ink and the silhouette in Riding Hood Red then ran it through the Big Shot with the oval embossing frame.  The edges were sponged in more Blushing Bride and some flowers were added with the Itty Bitty Punch Pack
A Riding Hood Red border was added with the Adorning Accents Edgelit die and the Basic Gray background was stamped with the flourish image from Creative Elements.
Lastly, some yummy Baja Breeze Pleated Satin Ribbon was augmented by an embossed strip of Baja Breeze run through the Framed Tulips embossing folder. I love how the embossed image really pops out with just a little bit of sponging.

You still with me?  I hope so because I have something for you...a free tutorial on Full-Page Printing in My Digital Studio!  I hope you like it...just follow the link below to download the PDF file.  It may take a few minutes to load, so please be patient.  After you try it out, please come back and let me know if it was helpful to you!

Just maybe you'll use my tutorial to print some paper for this week's sketch!  I hope you'll join us over at Create with Connie & Mary.  Be sure to check out the rest of the Design Team's lovely inspiration and then link up your crafty creations!  The challenge will run until Wednesday, February 1st at 12 Noon (EST).  I hope to see you in the gallery!


Tutorial: Full-Page Printing in My Digital Studio


Photobucket
Supplies 
Stamps: Forever Young, P.S. I Love You, Creative Elements
Ink: Basic Gray, Blushing Bride, Riding Hood Red, Baja Breeze
Paper: Basic Gray, Blushing Bride, Riding Hood Red, Baja Breeze, Whisper White; Twitterpated DSP (MDS)
Extras: Framed Tulips embossing folder; Baja Breeze pleated satin ribbon; Designer Frames embossing folders; Basic Pearls; Itty Bitty Punch pack; Adorning Accents Edgelits; 1 1/4" Square Punch

Thursday, December 15, 2011

Hybrid Snowboard {CCMC180}

Happy Thursday, friends, and welcome to another week at Create with Connie & Mary! December is just flying by isn't it?  We know you're extremely busy this time of year, so this week the gals have a nice and easy sketch for you:


The sketch is a square but you can alter it to a standard 4 1/4 x 5 1/2" size if you want.  I have to admit that I am a little burnt out on Christmas cards so I was very happy to use this sketch as a birthday card for my nephew:


It's not Christmas but it's still a winter-themed card.  My nephew LOVES to snowboard and can't wait for that first snow...living in Wisconsin, fortunately that isn't a problem!  I don't own any of the Extreme sports stamps but they're all in My Digital Studio--yay!  


So I added the Extreme Snowboard stamp to a page, colored it in Basic Grey and gave it a deep drop shadow.  The drop shadow feature really makes it pop off the page.  It almost looks like I fussy-cut it, doesn't it?  Behind my snowboarder, I added the splatter stamp from the Extreme Elements set in Pool Party.  Then I just printed that page on Whisper White paper and cut it to size. Even if you don't have My Digital Studio, Stampin' Up's digital images can be used as images in any image editing or word processing program.  How cool is that?
 

I used Basic Grey cardstock for the base and ran it through the Northern Frost embossing folder.  I sponged Whisper White craft ink over the snowflakes to give them a snowy-look.


A piece of Cherry Cobbler woodgrain designer paper from the Frostwood Lodge pack gave this card a rustic "boy" feel but I couldn't resist a little Silver Glimmer snowflake and Neutrals Glimmer Brad for a little sparkle.  Snow IS sparkly after all, right?  ;-)

Well, I think he will like it...and...I hope it inspires you to play along with this great sketch!  If you need even more encouragement, be sure to check out the rest of Design Team's work over at Create with Connie & Mary.  If you decide to play along with us, please link up your creation by Wednesday, December 21st at Noon (EST).  I can't wait to see what you create!  Thanks for stopping by!


Photobucket

Thursday, December 8, 2011

Sweet & Lucky Decorations {CCMC179} {SSSC146}

Happy Thursday, friends! Can you believe it's December 8th--yikes!  So much left to do before Christmas.  But you didn't come here to hear me whine...you came here for some eye candy, didn't you?!  It's color challenge week at Create with Connie & Mary...take a look:
Isn't this a fun take on the traditional red and green?  I love Basic Grey with anything!  I also used this fabulous sketch from this week's Sweet Sunday Sketch Challenge:


and was inspired to ink up an old favorite Christmas set, Delightful Decorations:

I flipped the sketch to the left-hand side, somehow it just worked better for me that way.  The Basic Grey base was layered with some Lucky Limeade designer paper from the In Color patterns stack as well as a fun Poppy Parade pattern that looks like snowflakes.  I wrapped the panel with some yummy Basic Grey satin ribbon and added a big bow with a a glue dot.
The ornaments were clear embossed in the challenge colors on Whisper White and layered atop a big beautiful Silver Glimmer circle--isn't it lovely?
Here's a close-up of a little background stamping I did with the Creative Elements set--doesn't it coordinate nicely with the limeade pattern?  I hesitated to buy this set but I really like how versatile each piece is--they really do add a little bit of a creative element to any project. Sorry, couldn't help myself!

So there you have it, folks!  I hope you like today's card and that it inspires you to play along with these fun colors.  Be sure to check out all the rest of the inspiring creations from the Create with Connie & Mary Design Team.  If you decide to play along, please link up your crafty goodness by Wednesday, December 14th at noon (EST).  I hope you'll play along with us!  Thanks for visiting today!

Photobucket

supplies:
stamps: delightful decorations, creative elements,tags til christmas
ink: poppy parade, lucky limeade, basic grey; versamark
paper: basic grey, whisper white, silver glimmer; pocketful of posies DSP; in color patterns stack
xtras: basic grey satin ribbon; basic rhinestones; white baker's twine

Thursday, December 1, 2011

Mod, Mod Holiday {CCMC178}

Hiya friends and welcome to another week at Create with Connie & Mary!  This week the gals have a sketch challenge for you:
I wasn't sure at first quite what to do with it--there's a lot of parts and pieces--but I just received a pack of the Christmas Lane Simply Scrappin' Kit and was inspired by all the paper and colors:
I just love the happy colors and modern prints in this kit!  It's a pretty straight-forward card with clean lines and clean stamping--not a distressed edge or spritz anywhere!  This is more the style of stamping I did when I first started before I was lured to the "dark side" with sponges and spritzers, files and blades, oh my!  LOL!  It is interesting how our styles evolve and it's fun to go back to the roots now and then, right?  My little tree is stamped in Lucky Limeade with the Pennant Parade set and rests on a Whisper White oval made with the Ovals die.
I kept the fun going on the inside with another tree and a sentiment from Petite Pairs.  It can be tricky to line up the tree stamp exactly with the little pot, so for this one I stamped the pot but used a punched piece (with the Petite Pennant punch) for the tree.  That way I could put it exactly where I wanted it!

It's been a long day so that's it for me folks!  I hope you enjoy today's card, please let me know if you have any questions.  I do hope you'll check out the rest of the Create with Connie & Mary design team and consider playing along with us.  Thanks for visiting!

Photobucket
supplies:
stamps: pennant parade, contempo christmas, petite pairs
paper: soft suede, lucky limeade, cherry cobbler, whisper white; christmas lane simply scrappin kit
xtras: ovals die; cherry cobbler baker's twine; basic rhinestones; petite pennants builder punch

Thursday, November 24, 2011

Happy Thanksgiving! {CCMC177}

Greetings everyone and to my friends in the United States, Happy Thanksgiving!  I have much to be thankful for today--family, friends and the ability to share with you all, a craft that I love!  I am so thankful for your continued visits to the Canopy, your supportive comments and the friends that I have made through blog-land!  So for today's Create with Connie & Mary challenge, I had to make a Thanksgiving card even though today's colors are a bit non-traditional for this holiday:
Lovely aren't they?  Greens and blues are some of my favorite colors and paired with River Rock they just sing!  Take a look:
I've been wanting to try sponge daubers with the medallion from Day of Gratitude so I did just that starting with the lightest color, River Rock in the center and proceeding with Lucky Limeade and finally Night of Navy on the edges.  I stamped onto Very Vanilla cardstock and then did some fussy cutting.
I inked and stamped another one, punching out the center with a 1 3/8" circle punch and decorating the center with pearls!  I carried the medallion into the inside:
stamping in River Rock and although the Night of Navy sentiment stamp I used is retired, it is available as a digital file in My Digital Studio.  Remember you don't need MDS to use a digital file--just download and use in any word processing or graphics program!

I chose this sentiment because it perfectly sums up my thoughts for you today...thank you!  Please be sure to stop by Create with Connie & Mary to see all the wonderful creations from the rest of the design team.  Thanks for stopping by today, friends!

Photobucket

supplies:
stamps: day of gratitude; hand-penned holidays; seasonal sentiments (MDS)
ink: river rock, lucky limeade, night of navy
paper: river rock, night of navy, very vanilla
xtras: filial press embossing folder; chantilly lace crochet trim; basic pearls; 1 3/8" circle punch; sponge daubers

Thursday, November 17, 2011

All Buttoned Up {CCMC176}

Happy Thursday, friends, and welcome to another week with the Create with Connie & Mary Thursday Design team! We alternate between sketch and color challenges and this week it's...Sketch Time!


Cool isn't it?  I wanted to do something a little different than a flower for the focal point so I dusted off the yet-to-be-used package of Shaker Frames from the Holiday Mini catalog and came up with this:


This one was personalized for a friend and co-worker who just happens to have the maiden name of....Buttons!  Of course, she loves them so I filled the shaker frame with designer buttons in Certainly Celery, Rich Razzleberry, Tempting Turquiose and...


a little bit of Mica Flakes for some added sparkle.  As if the scalloped circle of silver Glimmer Paper wasn't enough, right?!  There's never enough sparkle in my book!  I filled the back of the Shaker Frame with a 1 3/4" circle of Whisper White and cut a 2" circle from a clear window sheet with the Circles #2 die.  To cover the edges, the Glimmer Paper was punched with the 1 3/4" circle punch and the 2 3/8" scalloped circle.  You might also notice that the theme of circles runs through each element of the card in the polka dotted designer paper, the polka dot impression folder, the circle frame and, of course, the buttons themselves!  

The layout of the rectangles took a little bit of measuring so I thought I would share the dimensions I used:
  • Standard A2 card base
  • Whisper White panel: 5 1/4" x 4"
  • Rich Razzleberry rectangle: 1.5" x 3"
  • Certainly Celery rectangle: 2.5" x 2"
  • Tempting Turquoise rectangle: 2.5" x 1"
I'm going to keep this one short, friends.  It's been one heckuva busy week around here!  Be sure to stop on by Create with Connie & Mary to check out even more inspiration from the fantastic design team!  If you decide to play along with us, please link up your creation by Wednesday, November 23rd at Noon (EST).  I can't wait to come visit you!  Thanks for stopping by today!

Photobucket

supplies:
stamps: happiest birthday wishes
ink: tempting turquoise
paper: tempting turquoise, whisper white CS; silver glimmer paper; brights & subtles pattern designer paper stacks
xtras: shaker frames; white baker's twine; clear window sheets;designer buttons (subtles & brights); polka dot impressions fold; 1 3/4" circle & 2 3/8" scallop circle punches; circles #2 die

Thursday, November 10, 2011

Ode to Cherry Cobbler {CCMC175}

Hiya friends! It's Thursday and you know what that means....welcome to another week at the Create with Connie & Mary challenge!  This week those crafty gals have a lovely color combination for you; check it out:
Pretty, yes?  These colors seem very sophisticated and elegant to me--I pictured an elegant LBD (that's little black dress, dont'cha know) with a camel hair coat and a deep red flower brooch.  Can you see it?  I did!  So with that in mind, I created this:

Pretty clean and simple really but the wow comes from the flower and the lattice background.  I used the Lattice die to cut some More Mustard cardstock and laid it at the top of a 3.5" x 5" piece of Very Vanilla.  I ran little bits of snail tape at all of the intersecting loops.  I got a little bit outside the lattice edges but when you emboss it, you can't see it at all.
Then I ran just the top two thirds of the whole thing through the Big Shot with the Square Lattice embossing folder.  The result is a really cool inlaid embossing technique  with enough space at the bottom for a sentiment. The whole panel was matted in Cherry Cobbler to pull in the color of the flower.  And speaking of the flower:
It's made with two Cherry Cobbler flowers cut from the Fun Flowers die.  I ran both of them through the paper crimper many, many times to break down the fibers and peeled the larger one apart.  I flipped one side over for a sueded look.  Each petal was turned upward by a few passes with the bone folder.  For the center I used a black flower punched with the Blossom Bouquet Triple Layer Punch and a More Mustard designer button.  A little flourish of Basic Black wide striped grosgrain ribbon was tucked behind the flower to mimic leaves and add a little flair.

Pretty simple but the color combination packs a punch doesn't it?  Be sure to check out the rest of the design team where they are sure to have some gorgeous creations!  I hope you'll think about joining us this week at Create with Connie & Mary...I can't wait to see what you make of these colors.  If you do join us, please link up your crafty goodness by Wednesday, November 16th at Noon (EST) to be considered for the Top 3 picks!  Thanks for stopping by today!

Photobucket

supplies:
stamps: sincere salutations
paper: basic black, very vanilla, cherry cobbler, more mustard CS; patterns designer series paper stack (regals)
ink: jet black stazon
xtras: lattice die; fun flowers die; designer buttons (regals); blossom bouquet triple layer punch; basic black wide striped grosgrain ribbon; square lattice embossing folder

Thursday, November 3, 2011

It's a Beautiful Season {CCMC174}

Happy Thursday, friends!  First, I need to take a minute and thank so many new followers and readers for all the comment love on my blog hop card, here.  Your support and comments mean so much--they lift my spirits every time I read them--yes I do read them several times each, LOL!  

Today is Thursday and that means it's another week with a new challenge at Create with Connie & Mary!  This week it's a sketch challenge...check it out:
Cool, right?  I'm in full on Christmas card-making here under the Canopy so I turned to the Beautiful Season stamp set for a more traditional look:
The lovely chickadee was embossed in gold onto a 3" circle of Very Vanilla and colored with a blender pen and Always Artichoke, Cherry Cobbler and Early Espresso. 
The edges were sponged with Champagne Shimmer paint for an aged look.
I added a little dimension to the background with tone-on-tone stamping of the holly leaves behind the focal image.
My paper crimper added some texture to the Always Artichoke banner and a little button embellishment carried the sentiment from Tiny Tags.
Lastly, I inked the chickadee again in Early Espresso but stamped off once before adding it to the inside.  A little more champagne shimmer edging frames the Cherry Cobbler sentiment.  So...what do you think?  I would love to hear from you!  I hope I've inspired you to play along with Connie & Mary's great sketch!  Be sure to check out the rest of the design team for even more inspiration!  I hope you'll join us by Wednesday, November 9th at noon (EST).  I can't wait to see what you make of this sketch!  Thanks for your visit today!
Photobucket
supplies:
stamps: beautiful season; tiny tags
ink: early espresso, cherry cobbler, always artichoke, versamark
paper: early espresso, cherry cobbler, always artichoke, very vanilla CS; regals pattern stack
xtras: 3" circle die; jewelry punch; linen thread; champagne shimmer paint; designer butons (regals); gold stampin' emboss powder; blender pen

Thursday, October 27, 2011

Rich Comfort {CCMC173}

Happy Thursday, friends! Welcome to another week at Create with Connie & Mary. This week, the gals are bringing us a beautiful color challenge:
 
My favorite holiday cards usually use a non-traditional color palette so I was itchin' to try my hand at a Christmas card with these colors.  I think I succeeded...what do you think?
The Island Indigo card base was layered with two different patterns--one in Baja Breeze and the other in Rich Razzleberry--from the Pocketful of Posies designer paper.  I love using non-holiday paper for a holiday card!  I chose these two patterns not only for their color but because the shapes reminded me of snowflakes.
This dove from Comfort & Joy is so pretty!  Here, I inked it first in Versamark then Island Indigo ink, stamped and heat embossed with clear embossing powder.  I sponged the edges with Baja Breeze for a little definition and lightly colored the dove with Baja Breeze ink and a Blender pen.  Of course I had to add some Dazzling Diamonds to the wings...you know it's not a holiday card without Dazzling Diamonds!
The sentiment oval got the same sponging treatment as the main image and I also stamped the background with the swirly part of the main image that had been inked in Baja Breeze and stamped off once.  A little silver glimmer border and some Whisper White Organza Ribbon finished off the front...while some more designer paper and a little stamping, finished off the inside.
So what do you think...do these colors inspire you?  Check out the rest of the Design Team even more inspiration and then think about what you  might do with this week's color palette.  We would love to see!  If you can play along, please link up your crafty goodness at Create with Connie & Mary by Wednesday, November 2nd at noon (EST).  I can't wait to see what you make!
Photobucket
supplies:
stamps: comfort & joy; petite pairs
ink: baja breeze, rich razzleberry, island indigo; versamark
paper: baja breeze, rich razzleberry, island indigo, whisper white CS; pocketful of posies DSP
xtras: ovals die; silver glimmer paper; scallop border punch; whisper white organza ribbon; basic rhinestones

Thursday, October 13, 2011

A Gentle Seat {CCMC171}

Happy Thursday friends and welcome to another week at Create with Connie & Mary!  This week the gals have cooked up a beautiful color challenge for us, take a look:
Aren't they pretty?  I might have mentioned...it was going to be difficult for me to put down my new Gently Falling stamp set, right?  Well, I used it again on today's card:
Only this time, I took a cue from my friend, Ann Schach, and covered the stamped background with some cardstock vellum to mute the colors.  This allows my main image, from the Have a Seat stamp set, to take center stage. 
I inked the bench in Bravo Burgandy and stamped onto a Very Vanilla oval cut with the Ovals Original die.  Behind the bench, I stamped the flourish from Creative Elements in River Rock and sponged the edges with more River Rock.  Did you notice the Baja Breeze peeking out from behind?
Recognize it?  It's from the Lots of Tags sizzlits cut in half and layered each half behind the oval.  I'm always looking for different ways to mat or frame images and I really like the look of the partial mat here.
And a closer look at the little flower and sentiment banner--one flower from the Boho Blossoms punch and the other from the Itty Bitty Punch Pack paired with a flagged sentiment from Trendy Trees.  

What do you think?  Inspired to play along?  I hope so!  Be sure to check out even more Design Team inspiration over at Create with Connie & Mary.  If you play along with us, please load up your project at the Create with Connie & Mary blog by Wednesday, October 19th at noon (EST).  Thanks for stopping by, friends!


Photobucket

supplies:
stamps: gently falling, have a seat, creative elements, trendy trees (sentiment)
paper: river rock, baja breeze, very vanilla CS; designer patterned paper stack (regals)
xtras: ovals originals die; linen thread, boho blossoms punch; itty bitty punch pack; lots of tags sizzlits basic pearls; 1.25" square punch (to flag the banner end)