One of my friends from work attended my flower pin class a couple weeks ago. She wore her pin to work last week (it looked great!) which prompted another co-worker to place a custom order pin for a friend's birthday. How exciting--my first custom order! I made two so he could choose the one that he liked best. Having one left over will give me a jump start on family birthday presents in May!
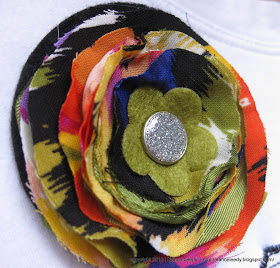
For the first one, I used 4 large flowers and 4 small flowers--all cut from the same fabric with the XL Flower Folds die (a SU exclusive). This is thin cotton fabric so before running it through the Big Shot, I sprayed it liberally with laundry starch. This gave it the stability it needs to stand up straight. I also added one layer of a large felt flower in the back to frame the flowers and, again, give it more weight and stability.
The black felt flower behind the brad is cut with the Island Floral die, a SU exclusive available May 1st in the Summer Mini catalog. It's the perfect size and because it already has a small hole in the middle, it's the perfect embellishment for brads, ribbon and thread. I also made a gift tag with the Two Tags die and the Great Friend stamp set that I tied onto the back of the pin with linen thread. This makes it all ready for gift-giving and easy-peasy for my customer!
The second pin was also cut from a total of 8 flowers--4 large and 4 small but this time I used 2 coordinating fabrics. Again, the fabric was sprayed with starch and I used a large felt flower in back. The center is a 2-piece beauty from my embellishment stash. The pink pearl brad is centered on the metal flower and pushed through the fabric. I think it sets off the colors in this one nicely.
I also made a coordinating gift tag in cameo coral and chocolate chip:
The second one is my favorite and since my customer chose the first one, I just might keep this one for myself...after all, my birthday is in May too! ;-)
Pages
▼
Wednesday, April 28, 2010
Monday, April 26, 2010
Paradise Umbrella
I think our long weekend spent in South Florida put me in a tropical mood! Here's yet another card using the Paradise stamp set. I love the images in this set--clean, graphic & modern. You know how you can find inspiration everywhere? Well, every time we visit my mom, I say "we need to make a card inspired by [her] deck umbrella":
It would make a great card, right? So, I had a little crafting time...and here it is:
What do you think? I stamped the leaves from Paradise directly onto kraft and layered it with chocolate chip and really rust (going to miss that one too!) cardstock. I think the chocolate chip striped grosgrain ribbon mimics the stripes in the umbrella quite nicely don't you? Now, if I could just get a pina colada to go with that umbrella....
supplies:
stamps: paradise; warm words
ink: chocolate chip
paper: very vanilla, kraft, chocolate chip, really rust cardstock
xtras: jumbo grommets; chocolate chip striped grosgrain ribbon
Sunday, April 25, 2010
The never ending card: PPA39
I really like how this card (finally) turned out. It started as an entry for the Color Q challenge using ruby red, bermuda bay, regal rose and pumpkin pie. I never would have thought to combine these colors but I think they look great! Of course, I never got the card finished before the challenge closed (sigh) so then I thought I might put it together for last week's sketch challenge at PPA38 and that didn't happen either (big sigh)! Aaaah! So this weekend my daughter and I had a little vacation at my mom's house and I finally had time to finish this card! Of course, it looks nothing now like I had intended in the beginning but I like it...and believe it or not, I think it works for this week's Pals Paper Arts 39: KISS! Hurrah! Each square is 2.25" x 2.25" and stamped with one of the leaves from the Paradise stamp set (LOVE it!) with Versamark ink. I sprinkled each liberally with white stampin' emboss powder and heat set each one. I love how crisp and clean the white looks against the strong colors. I'm sure by now you all recognize the new square lattice embossing folder--a Stampin' Up exclusive folder available May 1st with the new Summer Mini catalog. Send me an email if you would like to receive this fun new catalog! I wrapped the panel 3 times with linen thread and finished it with a ruby red button. The sentiment is from Hello Again and inked in bermuda bay on whisper white and punched out with the curly label punch. I thought the clean style of the font worked well with the clean lines of the squares and images on this card. Whew-glad to get that card off my craft table! On to the next one...
supplies:
stamps: paradise; hello again
ink: versamark; bermuda bay classic ink
paper: kraft, ruby red, bermuda bay, pumpkin pie, whisper white cardstock
xtras: square lattice embossing folder (avail May 1st); linen thread; white stampin' emboss powder; curly label punch
supplies:
stamps: paradise; hello again
ink: versamark; bermuda bay classic ink
paper: kraft, ruby red, bermuda bay, pumpkin pie, whisper white cardstock
xtras: square lattice embossing folder (avail May 1st); linen thread; white stampin' emboss powder; curly label punch
Friday, April 23, 2010
The curtain is almost down: CCCC26 & PPA39
It's the final hours of Stacey's Curtain Call Challenge and I couldn't resist this fabulously modern color combination. I love Crushed Curry & Basic Gray together and will be sad to say goodbye to Crushed Curry when it retires this June. Back to the card...this one might be as simple as it gets. This is a combination card that meets Stacey's color challenge as well as the current KISS challenge at Pals Paper Arts (PPA39). I punched the corner of the whisper white card with the boho blossoms punch and then placed a piece of basic gray dsp (from a retired hostess pack) behind the punched shape. This adds a surprise element to the inside of the card and is a fun way to show off the designer paper. I finished off the front with the polka-dot grosgrain ribbon in crushed curry and a sentiment from Sincere Salutations in basic gray. I did not have any going gray to use on this card but I'd like to think that the flowers on the basic gray dsp are close enough! Some adhesive rhinestones from my stash accent each of the flowers. Did you notice that the rhinestones are scaled in size with each flower?
supplies:
stamps: sincere salutations
paper: whisper white cardstock; basic gray dsp
xtras: boho blossoms punch; crushed curry polka dot grosgrain ribbon; adhesive rhinestones.
supplies:
stamps: sincere salutations
paper: whisper white cardstock; basic gray dsp
xtras: boho blossoms punch; crushed curry polka dot grosgrain ribbon; adhesive rhinestones.
Sunday, April 18, 2010
Fabric Pin class
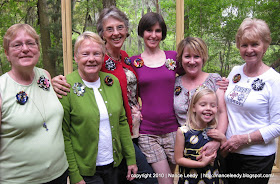
We had so much fun at the fabric pin class that I just had to share the pictures with you! Prior to the class, and with some help from my mom, we cut many samples of fabric for everyone to choose from:Everyone arrived and there was no time to waste!
We made two flower pins. The first one using the Flower Folds die which I detailed in this post here and was inspired by the Stamp Shack Lady. The ladies chose their fabrics and from a selection of brads, buttons and embellishments adorned their flowers. And look at what they made!
Aren't they beautiful?! After all these, we wanted to make more! Everyone made a second pin using the heated fabric technique. We cut 4-6 layers of fabric using the 3 largest circles on the Circle #2 die, attached them together with a brad and singed the edges with a heat gun. The technique is detailed on the Stamp Shack--what a great source of inspiration! It's great fun to watch the fabric shrink up and form beautiful flowers like these:
Don't they look like pansies? We hope this inspires you to make your own!
Thursday, April 15, 2010
Why it's called Canopy Crafts
Trees inspire me. Their craggy branches, the spanish moss, oh how I love the moss! Their stately presence calms and soothes me. I prefer the quiet of a woodland hike to the glaring sun of the beach any day. Kind of ironic since we live in Florida! But, we are in the right part of the state for trees. I promise I will get to a card soon but first I just had to share these photos of our North Florida tree canopy. These were taken on a family hike Easter weekend.
There is a magic to it all that has a hold on me.
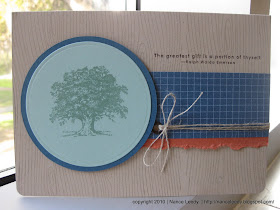
It is this spell that is the namesake of my adventure in blogland and inspires me to make cards like this one:
and the inside:
What inspires you?
There is a magic to it all that has a hold on me.
It is this spell that is the namesake of my adventure in blogland and inspires me to make cards like this one:
and the inside:
What inspires you?
stamps: of the earth (hostess); woodgrain background; lovely as a tree; wonderful words (retired)
ink: versamark; sage shadow; chocolate chip
paper: kraft, very vanilla, really rust, sage shadow, not quite navy CS; hostess dsp pack
xtras: clear stampin' emboss powder; linen thread; eyelet (my stash); circle nestabilities
ink: versamark; sage shadow; chocolate chip
paper: kraft, very vanilla, really rust, sage shadow, not quite navy CS; hostess dsp pack
xtras: clear stampin' emboss powder; linen thread; eyelet (my stash); circle nestabilities
Wednesday, April 14, 2010
MFW Shout Out!
I was so pleased to check my blog reader today and discover that Cath over at Moxie Fab World gave me a shout out for this card on the Pick Up the Pieces challenge! Cath is the Creative Editor at Papercrafts Magazine so this is a huge honor--thank you so much! The challenge was to use paper pieces and I had so much fun stamping onto designer paper and cutting out the fun pillows, lampshade and couch! Be sure to check out the fabulous winners and other shout-outs. So much creativity out there!
Wednesday, April 7, 2010
Fabulous Fabric Flower Brooch class
There's still time to register for this Saturday's brooch making class! You can register via my Pay Pal button or with an email to me: nleedy@cox.net
Hope to see you there!
Thursday, April 1, 2010
Curtain Call Color Challenge: Act 23
When I saw the inspiration photo and colors in this week's Curtain Call Color Challenge (Act 23), I knew right away that I wanted to use the Fine Flourish stamp with white embossing. I think the results are simple sophistication. The fine flourish stamp has got to be one of SU's finest ever. The detail is so amazing and it stamps beautifully. I stamped it twice with whisper white craft ink on Kraft cardstock and heat embossed with white embossing powder. The heat embossing bent the cardstock a little so I decided to trim the piece and layer it on top of the base card. With a open scallop punch from basic black cardstock peeking out at the bottom it almost looks like designer paper doesn't it? I also love the colors of this challenge and the unexpected elegance of the black leaves against the Kraft cardstock. The perfect combination for my oh-so-stylish mother who I had in mind when I made this card. Taupe and black is her absolute favorite go-to color combination and I immediately thought of her when I saw these challenge colors. The flower is made by distressing two pieces of Pretty in Pink cardstock punched out with the extra large fancy flower punch. Here is another card I made with this same technique. The leaves were cut out with my Big Shot and the SU exclusive Little Leaves die. The sentiment is stamped onto whisper white with jet black Stazon which gives such a crisp black impression. It was punched out with the wide oval punch and finished off with a little butterfly cut from the Beautiful Wings embosslit. Let me know what you think!
supplies:
stamps: fine flourish; well scripted
paper: kraft, whisper white, pretty in pink, basic black cardstock
ink: whisper white craft ink; jet black stazon
xtras: white embossing power; wide oval punch; beautiful wings embosslit; litte leaves sizzlit; extra large fancy flower punch; SAB scallop edge punch; halfback pearl (my embellishments stash)
Fabulous Flower Brooch Class
Have you seen them everywhere? Flowers are all the rage this spring! They are on everything from tops, skirts and dresses to shoes, purses and jewelry and even home furnishings and accessories. Come see how the Big Shot will cut through fabric to make these darling flower brooches. Two different styles, petal and round, to fit your every wardrobe mood.
Join us Saturday April 10th @ 2pm in my home for a flower-making fest! I'll show you how to make two brooches--both styles--from your choice of fabrics and finishing embellishments (provided).
Space is limited to 8 participants. Reserve your spot today through my Pal Pal button on the right sidebar just under my picture or send me an email to hold your spot!
Hope to see you there!